
Create a new drawing.
The ability of a designer to achieve absolute precision in the construction of engineering drawings is largely the result of object snaps. In the sections that follow, you will begin to appreciate very quickly the value of these very powerful tools.
Object snaps constrain point specification to exact locations, such as a midpoint or an intersection, on existing objects. Using object snaps is a quick way to locate an exact position on an object without having to know the coordinate or draw construction lines. For example, you can use an object snap to draw a line to the center of a circle or to the midpoint of a line segment. You can specify an object snap whenever AutoCAD LT prompts for a point.
If AutoSnap is turned on, AutoCAD LT displays a marker and a tooltip whenever you move the target box over a snap point. This feature provides a visual clue that indicates which object snaps are in effect.
There are a variety of ways to turn on object snaps. If you choose an individual object snap on the toolbar or enter its name on the command line, the snap stays in effect only for the next point you specify. You also can set running object snaps, that is, one or more object snaps that remain in effect as you work.
Below you will find a brief description of each of the snap tools:
| Icon | Tool |
| Snap to Endpoint - Endpoint snaps to the closest endpoint of objects such as lines or arcs. | |
| Snap to Midpoint - Midpoint snaps to the midpoint of objects such as lines or arcs. | |
| Snap to Intersection - Intersection snaps to the intersection of objects such as lines, circles, arcs, and splines. | |
| Snap to Apparent Intersection - You can use Apparent Intersection to snap to points where objects appear to intersect if they were extended. | |
| Snap to Center - Center snaps to the center of an arc, circle, or ellipse. | |
| Snap to Quadrant - Quadrant snaps to the closest quadrant of an arc, circle, or ellipse (0, 90, 180, and 270 degree points). The location of the quadrant points for circles and arcs is determined by the current orientation of the UCS (user coordinate system). | |
| Snap to Tangent - Tangent snaps to the point on an arc, circle, ellipse, or planar spline that forms a tangent to another object. | |
| Snap to Perpendicular - Perpendicular snaps to the point on an object that forms a perpendicular alignment, with another object or with an imaginary extension of that object. You can use the Perpendicular object snap with arcs, circles, ellipses, lines, polylines, or splines. | |
| Snap to Node - Node snaps to a point object drawn with the POINT command. | |
| Snap to Nearest - Nearest snaps to a point object or snaps to the location on another type of object that is closest to the selection point. | |
| Snap to None - Turns off running Object Snap mode for the next point. | |
| Object Snap Settings - Allows you to set the running object snap settings. |
Snaps can be used to place objects or locate points for virtually any object such as: lines, circles, ellipses, arcs, polygons, and dimensions. In addition, snaps can be used to move an origin point (discussed in the next section).
To illustrate the concept of snapping, please draw the following objects inside your drawing area roughly proportional to what you see below. Size is not important.

Object Snap Settings
Select the Object Snap Settings ![]() button or select Tools - Drafting Settings from the main menu bar.
button or select Tools - Drafting Settings from the main menu bar.
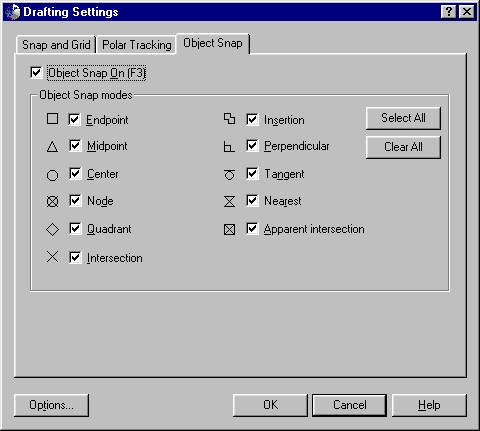
Select all of the Snap modes above and set the Snap Mode to On.
A shortcut to turning on the Snap Mode is the F3 key or by clicking on the OSNAP button in the lower portion of your window.

Next, turn off the Snap settings (not the Object Snap). Turning off the Snap will allow a greater range of movement for demonstration purposes.
![]()
Next, select the line tool and then (without clicking the mouse) move your mouse over top each of the drawing objects in your drawing area. You should see the various marker symbols appear as you move your mouse over the objects.
 |
 |
 |
You will notice that the mouse cursor need not be exactly on top of the precise location in order for the object snap mode to be activated. With the running snap mode on, you can be assured that the placement of objects such as lines, circles or dimensions will be precise. Even if you do not click your mouse directly on the exact location.
With running object snap on, if you wish to place an object close to but not at a particular snap location, you can override the snap mode by pressing the Snap to None button or by turning off Object Snap.
Sometimes, you may wish to control the snap modes manually. To do this you can turn off the running object snap (F3 or OSNAP button) and then select each desired snap mode as you need them.
Turn off the running object snap. Next,
select the line tool. Then select the Snap to Intersection
![]() tool. Next, move your mouse over top the intersecting lines in your
drawing area.
tool. Next, move your mouse over top the intersecting lines in your
drawing area.

You will notice that only the Intersection snap symbol appears and no others.
Turn your running object snap back on.
You may have noticed that some of the snaps modes (such as snap to tangent) do not appear with running object snap turned on.
In a case such as this, you need to select the snap by clicking on the desired snap mode and then select the point.
Try snapping a line tangent from one circle to the tangent of another circle (see below).

To do so, you will need to select the line tool, then select the snap to tangent tool, then click on the location where you wish to draw from, select the snap to tangent tool again, and then select the second tangent location.
Remember: the desired snap mode must be used for each point
Practice snapping various objects (lines, circles, polygons, etc.) to snap locations in your drawing area. When you are comfortable in using object snaps, begin the activity for this section.
![]()