The theme for Information Processing 11 is Business Information Processing. In this unit you will explore using electronic spreadsheets to help manage business information. You will be required to complete two projects. The first workbook consists of a quarterly report for "Resort Sales Incorporated". The second workbook consists of building an electronic sales document.
"Resort Sales Incorporated" Quarterly Report
In this workbook, you will be entering revenue and expenses data for 4 different regional offices. In addition, one of your worksheets will consolidate all the data entered in the other worksheets to present a comprehensive statement of company income and expenses. Finally, you will build charts comparing: profits by region, total income by category, and total expenses by category.
Project Requirements
This workbook will consist of the following worksheets:
An explanation of each with illustrations will be given below.
If you haven't done so already, create a new workbook in Excel and save the file as "Unit4_proj1".
Label 6 different worksheets as follows:
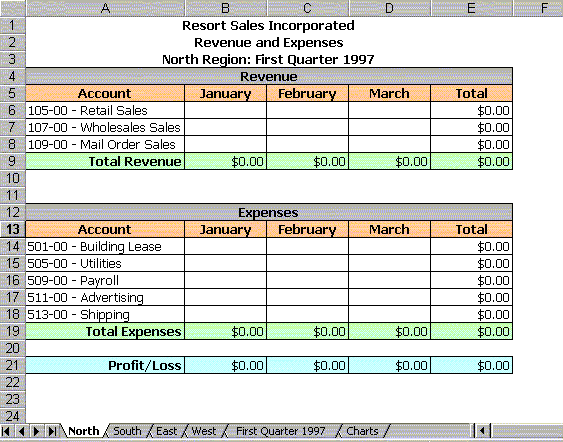
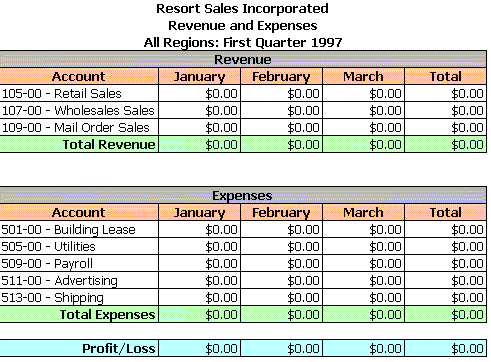
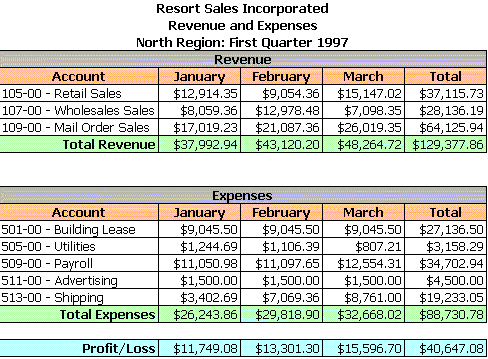
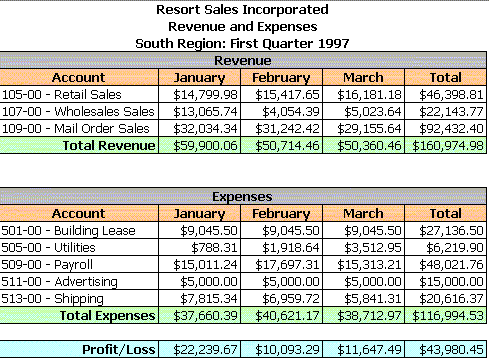
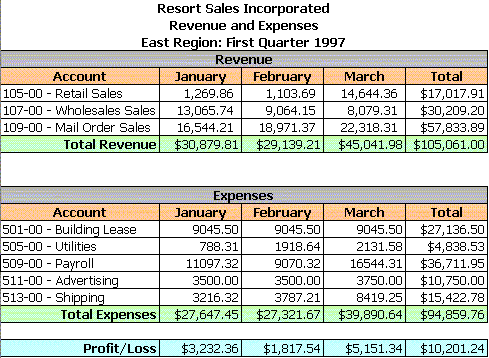
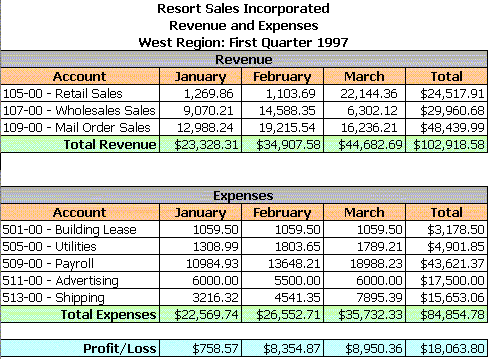
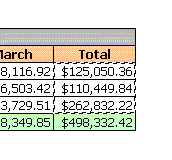
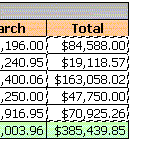
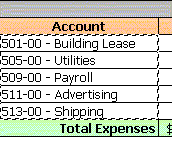
Create the North Region worksheet as follows:
Format all cells that are to contain currency values to: English (Canadian) currency using the format - cells - number option.
Note: all Total, Total Expenses, and Profit/Loss cells must contain formulas that automatically calculate their respective values.
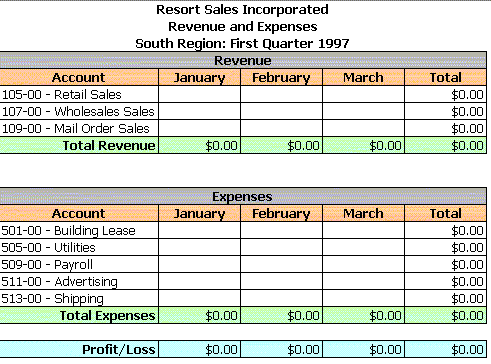
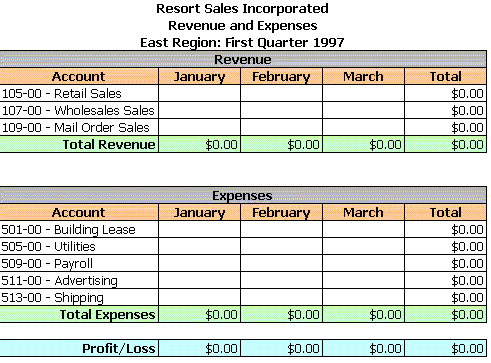
Rather than re-build the same worksheet for each region and the First Quarter, I suggest copying the North worksheet and pasting it into each of: South, East, West, and First Quarter. When this is done, edit the titles within each worksheet to reflect the current region.
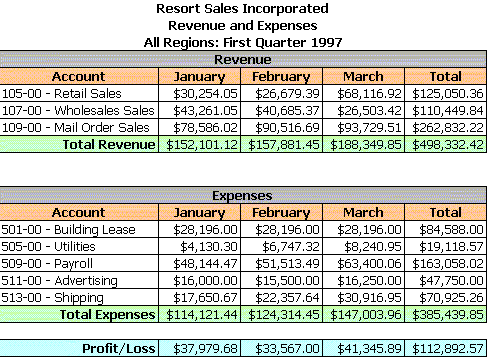
For the First Quarter worksheet, all of the data cells are calculated automatically (ie. you must not enter any data manually). Each cell must equal the sum of the 4 identical cells in the other worksheets. When one cell is finished, you can drag the formula to all the other cells (rather than create each formula manually).
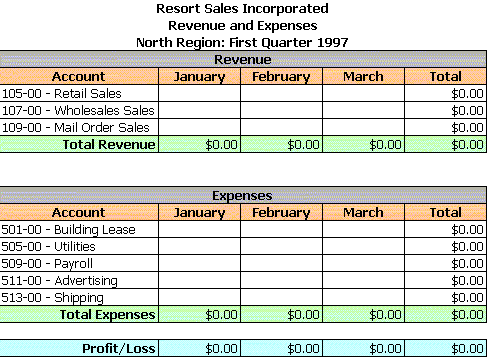
When done, your worksheets should look as follows:

Locking Cells and Protecting Your Worksheets
By locking cells and protecting your worksheet, you can prevent others from changing the appearance of the worksheet as well as protect cells (that should not change) from alteration. This becomes especially important when you are trying to protect formulas. Indicated below is a brief description of the steps required to lock a worksheet.
By default, all cells in a worksheet are set to "locked", however the locking mechanism is not activated until you protect the worksheet. To activate the locking mechanism in Excel, you must use the Toos - Protection - Protect Sheet... menu item (see below).
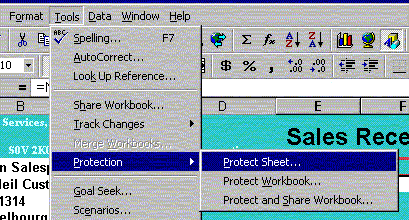
When you select this the following window will appear.
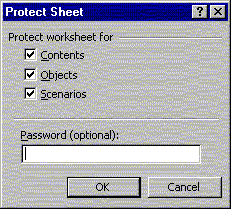
Leave all checkboxes checked and the password field blank. In a business setting you may want to password protect the design to prevent others from altering the design of your worksheet.
To unlock the worksheet, select the Tools menu item again and then select Protection - Unprotect Sheet.
Before protecting the worksheet you will need to set any cells that need to be accessed by the user to unlocked. To do this, select the cell(s) you wish to unlock with your mouse and then select the Format - Cells menu item. You will see the following window.
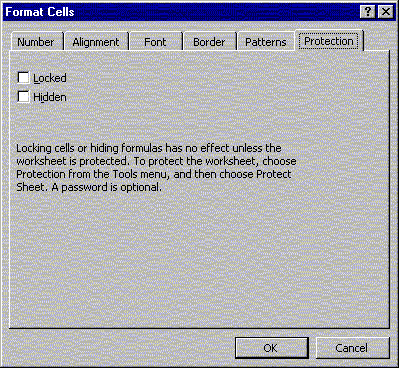
Select the Protection Tab and set the Locked checkbox to not checked.
Once this is done, you can then Protect the Worksheet. Now only the cells that have been unlocked can be accessed by the user.
I would now like you to set all cells that require data (ie. cells that do not contain any data or formulas within the working area of your worksheet) entry to unlocked. You will need to do this for every worksheet.
Next, select each worksheet and then protect it. Do not password protect your worksheets (I need to get inside them when I mark your projects).
Try editing one of the locked cells. You should see the following message appear:
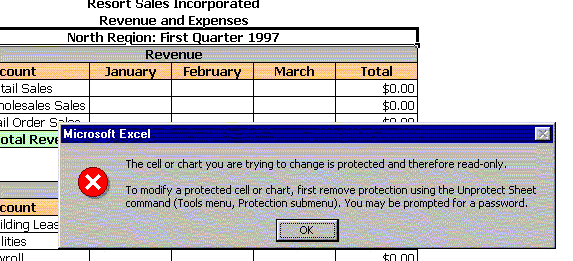
If you need to modify the design of any protected worksheets, you will first need to unprotect them.
Note: I want all your worksheets protected when you have finished this project.
When you have finished designing and locking your primary worksheets, you can then begin entering the data as follows. Remember that all totals and profit loss values are auto calculated on the North, South, East, and West worksheets. All data cells in the First Quarter worksheet are auto calculated (ie. imported from the other worksheets).
Charting
A powerful feature of many spreadsheet applications is the ability to graphically represent data. Charts enable individuals to present useful information that describes relevant business information.
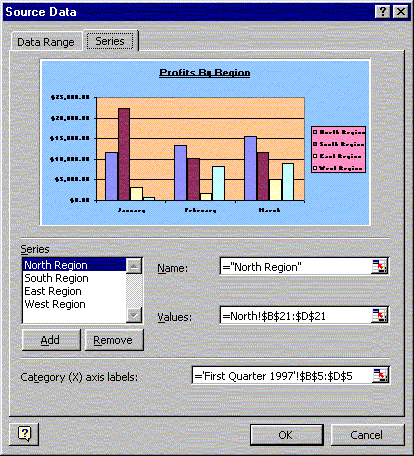
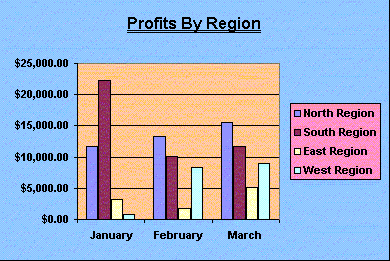
Profits By Region
Please place all charts in your Charts worksheet. When done, protect the worksheet (no password).
In your first chart, I would like you to prepare a column chart comparing net profit in each region. In this chart, you will need to create 4 separate series (North Region, South Region, East Region, and West Region). The values for each series come from the profit/loss cells for each month (within each regions worksheet). The name for each series can be typed in manually or imported from each regions respective worksheet. The (X) axis labels (months of the year) can be imported from any one of the regions worksheet or typed in manually (ie. "January", "February", "March").
Please title and format your chart as follows.
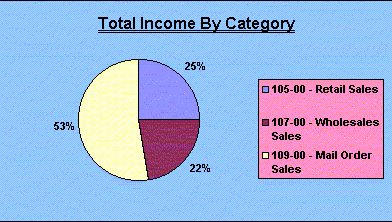
Total Income by Category
In this chart, I would like you to prepare a pie chart comparing total income by category. In this chart, you will only need a single series (data comes from First Quarter worksheet). The values for this series come from the total column (one total for each of the 3 categories) in the revenue portion.
You will also need to get the 3 category labels from the Account column.

Please title and format your chart as follows.
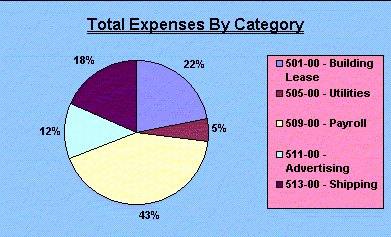
Total Expenses by Category
In this chart, I would like you to prepare a pie chart comparing total expenses by category. In this chart, you will only need a single series (data comes from First Quarter worksheet). The values for this series come from the total column (one total for each of the 5 categories) in the expenses portion.
You will also need to get the 5 category labels from the Account column.
Please title and format your chart as follows.
Last Updated Nov. 9/99